TUTORIAL
Note that the tutorial is a work in progress, but I hope to have it completed by the end of January (2022!) and provide many more illustrations and a more coherent structure than at present.
Getting familiar
By far the simplest way to learn about Jocular is to load and manipulate an earlier capture rather than trying to familiarise yourself under a pristine sky on a rare night of excellent seeing.
Loading a previous capture
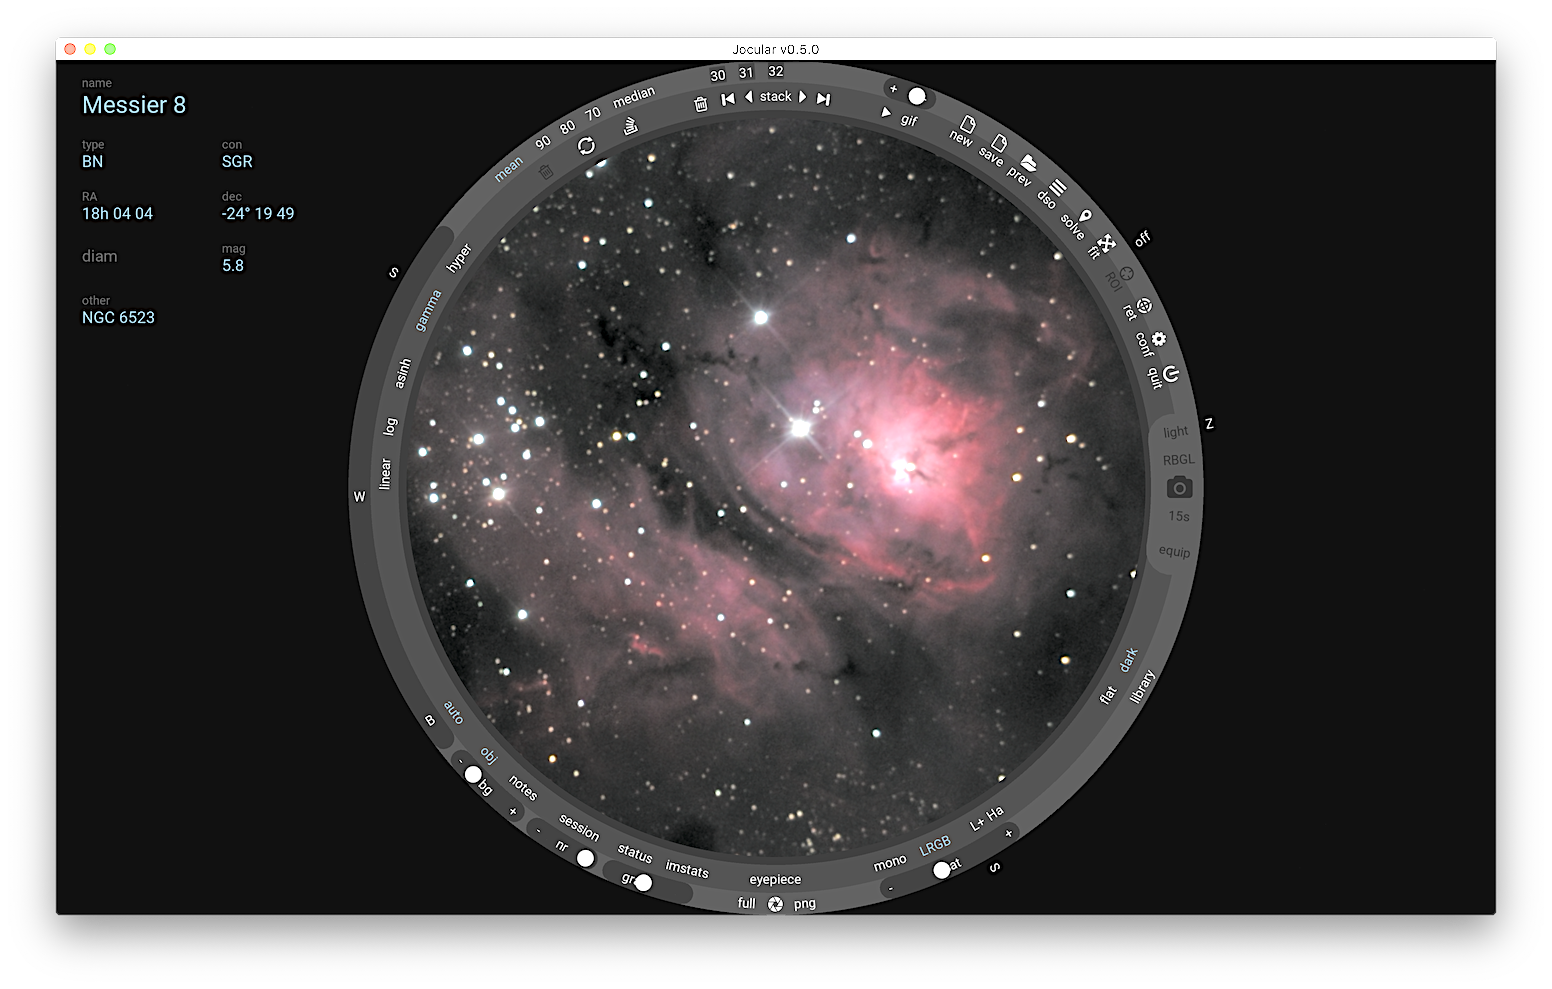
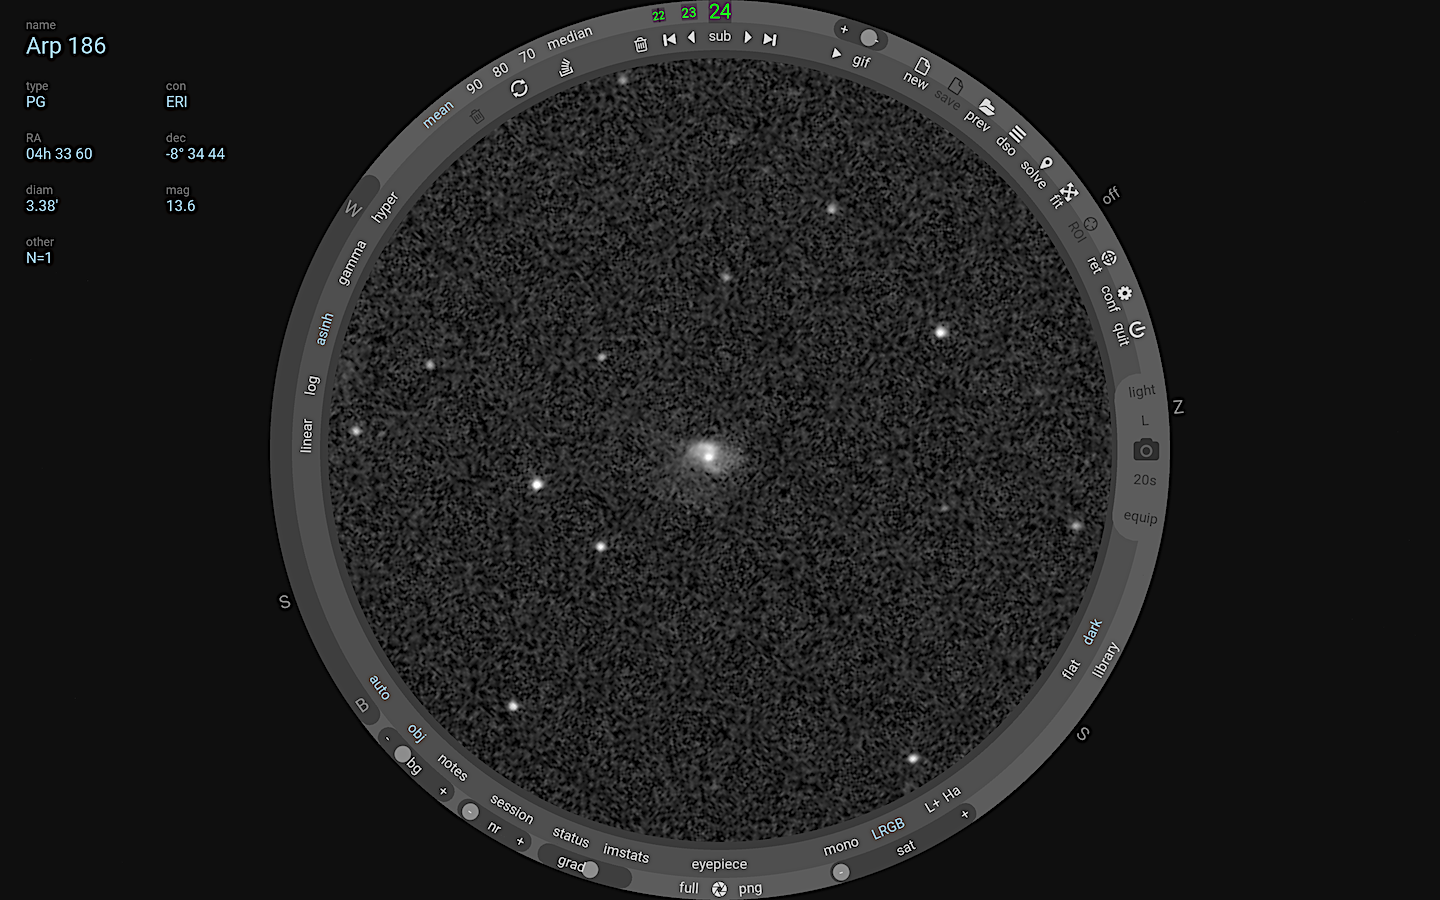
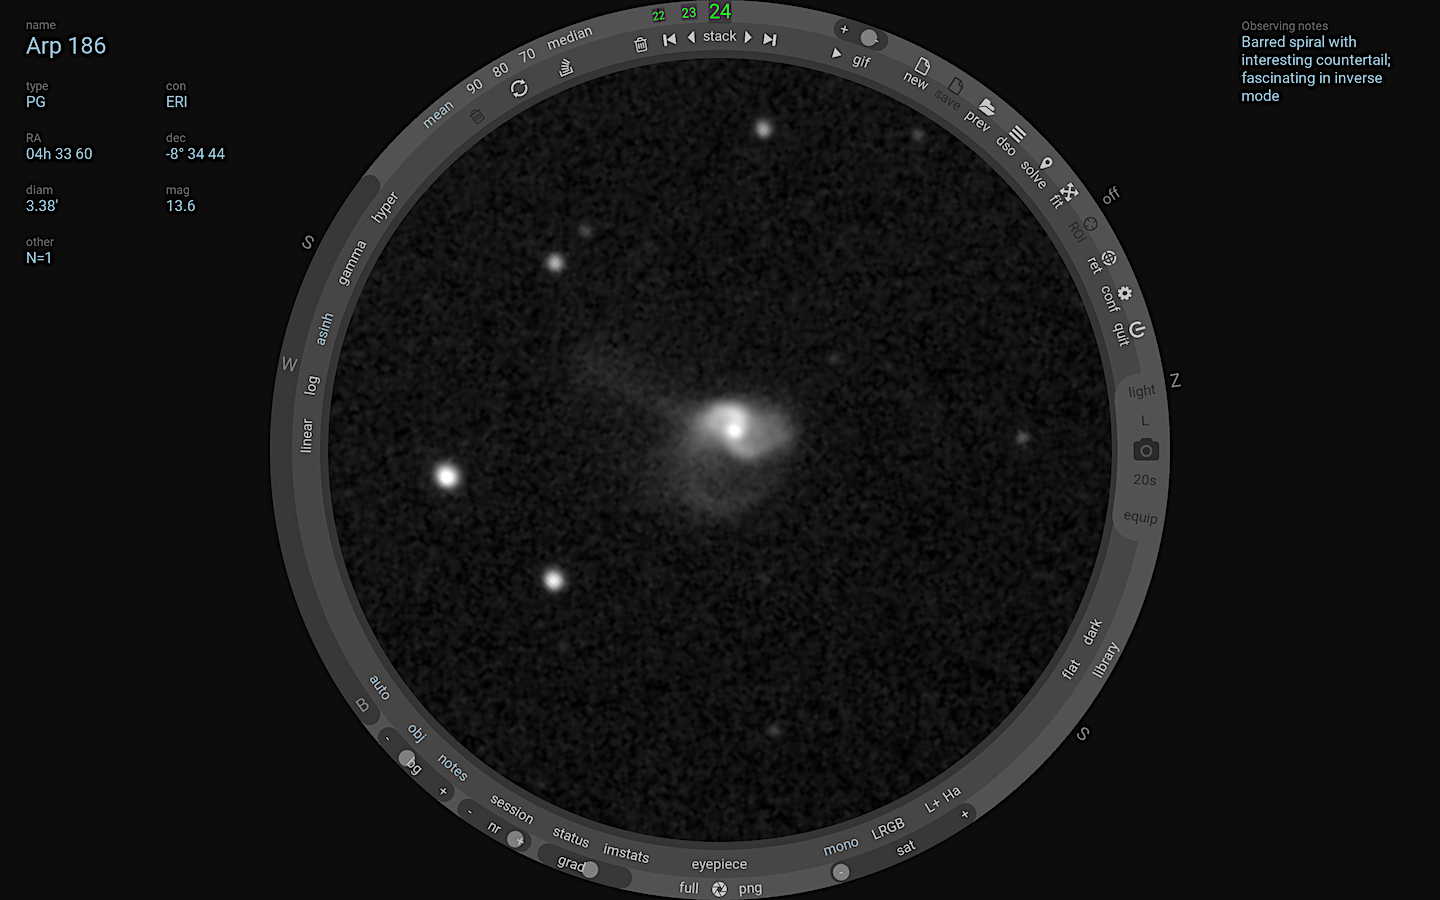
Loading a previous capture is exactly like using the tool in live mode apart from issuing the capture commands, so it is a good place to start to get to know the tool. I've included a couple of examples to get you started, one monochrome and the other colour. Clicking on the 'prev' icon in Jocular (at about 1 o'clock on the eyepiece ring) will bring up a table of earlier captures; click on a name to load the capture. I suggest you start with Arp 186; we'll look at colour later.
When loaded, the display will look something like this.
Dragging, rotating, zooming and inverting
The image can be dragged by selecting in the central two-thirds of the eyepiece region; selecting in the outer part enables the image to be freely rotated. Zooming is currently done using the 'z' slider (positioned at around 3 o'clock). Double clicking (only in mono mode) inverts the image i.e. produces a negative version.
Tooltips
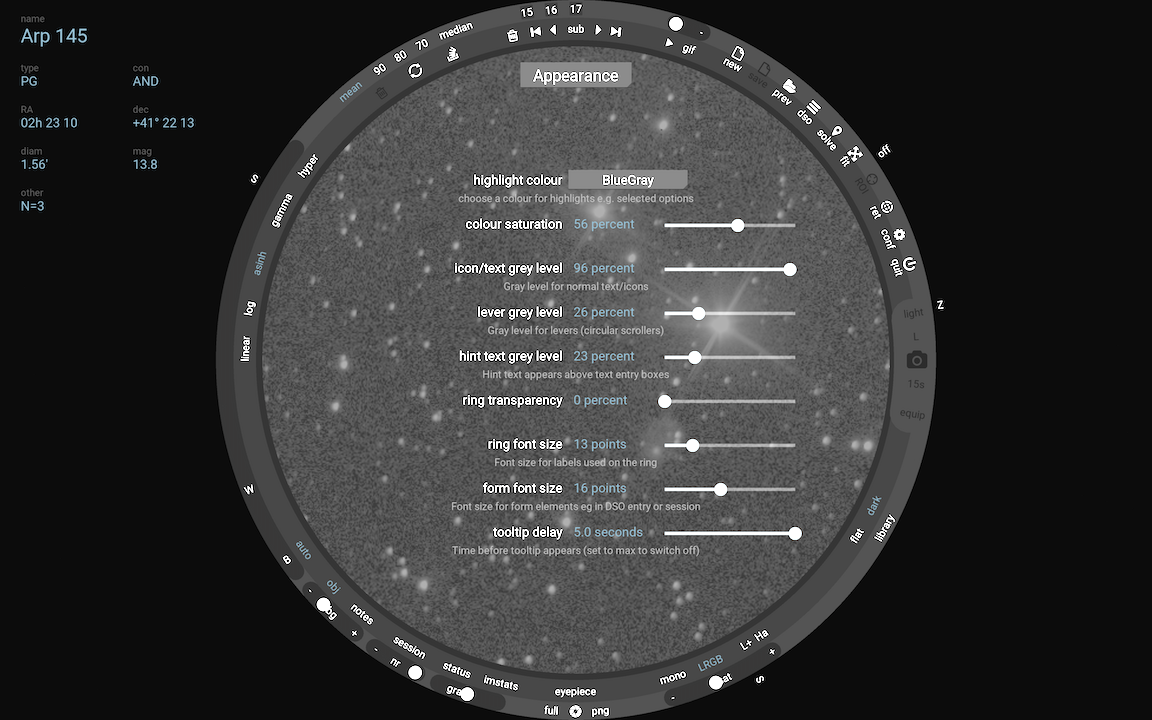
To begin with, it is worth spending a little time exploring the tooltips that pop up when you hover over the various controls. After a while you'll probably want to increase the time before you see the tooltips, or get rid of them altogether, so let's have a quick look at the configuration system, which appears when you click on the 'conf' icon (at 2.30 on the ring).
Settings
Each component of Jocular has its own settings; these are selected using the dropdown at the top of the config screen. To change the tooltip delay, choose the 'Appearance' screen and use the slider to select a reasonable delay. While you're here, if you find the font sizes too large or small, or the colour is not to your taste, try altering the settings on the Appearance screen; most take effect immediately. Moving the mouse away from the 'eyepiece' closes the config screen.
There are a number of typically once-only configurations that you might want to perform. These include:
- setting the latitude and longitude of your observing site (used in the DSO planner) via the Observatory settings panel
- choosing whether your images need to be flipped horizontally and/or vertically so that they can, in principle, be rotated to match the normal view on a star atlas (important for platesolving) via the View panel. For instance, on my Newtonian I need to do a left-right flip.
The subs and the stack
Now, back to the DSO. At the top of the ring you'll see a sequence of numbers. These represent the individual frames ('subs') that were captured. Use the arrow icons just below the numbers to scroll through the subs. Clicking the right arrow next to the 'gif' command is a way to cycle through the subs automatically; the control above the arrow alters the speed of 'animation', and selecting 'gif' saves the animation to your snapshots directory within your joculardata directory.
When a previous capture is loaded the tool defaults to showing the individual subs, but what we're mainly interested in is the result of combining, or 'stacking' them. Click on the 'sub' toggle at the top of the screen to see the stacked image. Click it again to return to the subs. We can also step through and animate the stacked image to see how the stack changes as more subs are added. There are more stacking controls that can be used to change the way the subs are combined into the stack ('mean', 'median', etc), to clear the stack or to recompute or shuffle the subs.
Next, let's manipulate the image. The monochrome manipulation options occupy most of the left side of the eyepiece. Much of the space is taken up by a circular slider that represents the range of intensities in the image, and contains controls labelled 'B' (for black), 'W' (for white) and 'S' (for stretch).
Estimating the background level
A fundamental process is determining the level of the sky background -- what's sometimes called setting the black point. This can be done manually by unclicking the 'auto' option and moving the B slider, but it is much easier and just as flexible to allow Jocular to estimate the background level by leaving the 'auto' option selected (whereupon the B slider is inoperative). We'll treat Jocular's background estimate as a starting point, and then use the slider marked 'bg' (for background) to refine it. Moving the slider downwards (anticlockwise) allows in more of the background, which is usually desirable.
Stretching the image
The white point slider and the stretch control influence the way the range of intensities in the image are mapped to the screen. These are used alongside a choice of stretch 'family', selected using the options 'linear', 'log' etc. First, note that all intensities in an image are represented internally by numbers in the range 0 (black) to 1 (white) regardless of how many bits the original image had. All image values below the background level are set to 0, and all those above the W point are set to 1. Then the range of intensities are mapped to screen intensities using a curve (function) from the chosen family. In the case of linear (a poor choice for astronomical images!) the mapping would be linear, but in general the mapping will be such that very bright regions are compressed into a smaller part of the display intensity range so that fainter regions can be given more room. Apart from the linear family, the other types of curve (log, gamma, etc) have a free parameter (the S slider) that controls the ratio of expansion of the fainter parts and compression of the brighter parts. As S moves clockwise the expansion of the faint parts increases.
So now, by moving W, S and bg, and choosing a stretch family, you should be able to produce an image that contains the level of detail desired. There is not necessarily one 'correct' setting; this style of observing is interactive, and one moment you might be using a severe stretch to pull out faint details, and another a less severe one to produce a less noisy image.
A final stacked image might look like this:
Noise reduction
Some of the stretch families are very useful for most of the intensity range but their mathematical properties can lead to undesirable noise when the intensity is very low (specifically, their gradient tends to infinity, amplifying small image intensity changes that are often due to noise). For this reason Jocular implements a very mild form of artefact-free noise reduction on the image, operated via the 'nr' slider. At its most clockwise end noise-reduction is switched off.
Gradient reduction
Many images contain large scale changes in brightness -- gradients -- across the image due to the likes of nearby light sources or the moon. The 'gr' slider is used to subtract a 2D linear (planar) estimate of the gradient from the image. At the clockwise end it is switched off, while in the middle of the range it subtracts the best estimate. The slider provides the possibility of subtracting more or less of the estimate, in cases where the gradient has been under- or over-estimated.
The above covers basic controls for monochrome images. For colour images things are only a little more complex.
Colour
To try out the colour controls, click on 'prev' again and load Messier 8. Once the 32 subs that make up this capture have been loaded you'll see a monochrome image of the last sub on the screen. Jocular handles colour by synthesising it from subs captured through blue, red, green and (optionally) luminance filters. If you step through the sequence of subs, you'll see the background colours of the numbers change to identify the filter used for that particular sub (dark grey represents luminance). What this means is that colour is synthesised only when you examine the stack. Click on the sub toggle to see this in operation. You should see an image somewhat like the one at the top of this page.
In normal 'live' use, colour is synthesised as soon as Jocular receives at least one sub in each of the R, G and B filters. Internally, Jocular does not use RGB space colour manipulations but instead uses LAB (Luminance plus two chrominance channels, A = red-green opposition and B = blue-yellow opposition). If Jocular has only RGB (no luminance) it synthesises a luminance channel to allow LAB-space manipulations to be performed.
One advantage of working in LAB space is that colour manipulations can be both simpler and more intuitive, characteristics that are advantageous in a live-viewing context. In fact, there are only two controls dedicated to chrominance: saturation ('sat') and a separate colour stretch ('S'). The luminance channel is manipulated exactly as for monochrome images using the B/W/S/stretch family controls. However, as you'll quickly find, there is not a complete independence between the various controls; the more an image is stretched in luminance, the less saturated it becomes -- unless compensated for by the colour stretch slider. I find the gamma stretch family to be good for colour manipulations, in part because the stretch family that underlies the colour stretch function is actually a gamma family.
Capturing images
While loading previous images is useful, the main purpose of live observing is to observe live. there are two ways to do this. We can either use Jocular to control all aspects of the capture process, or we can use a separate program that communicates with Jocular by dumping its images (in FITS format) into a directory that Jocular monitors. We'll look first at Jocular-controlled captures.
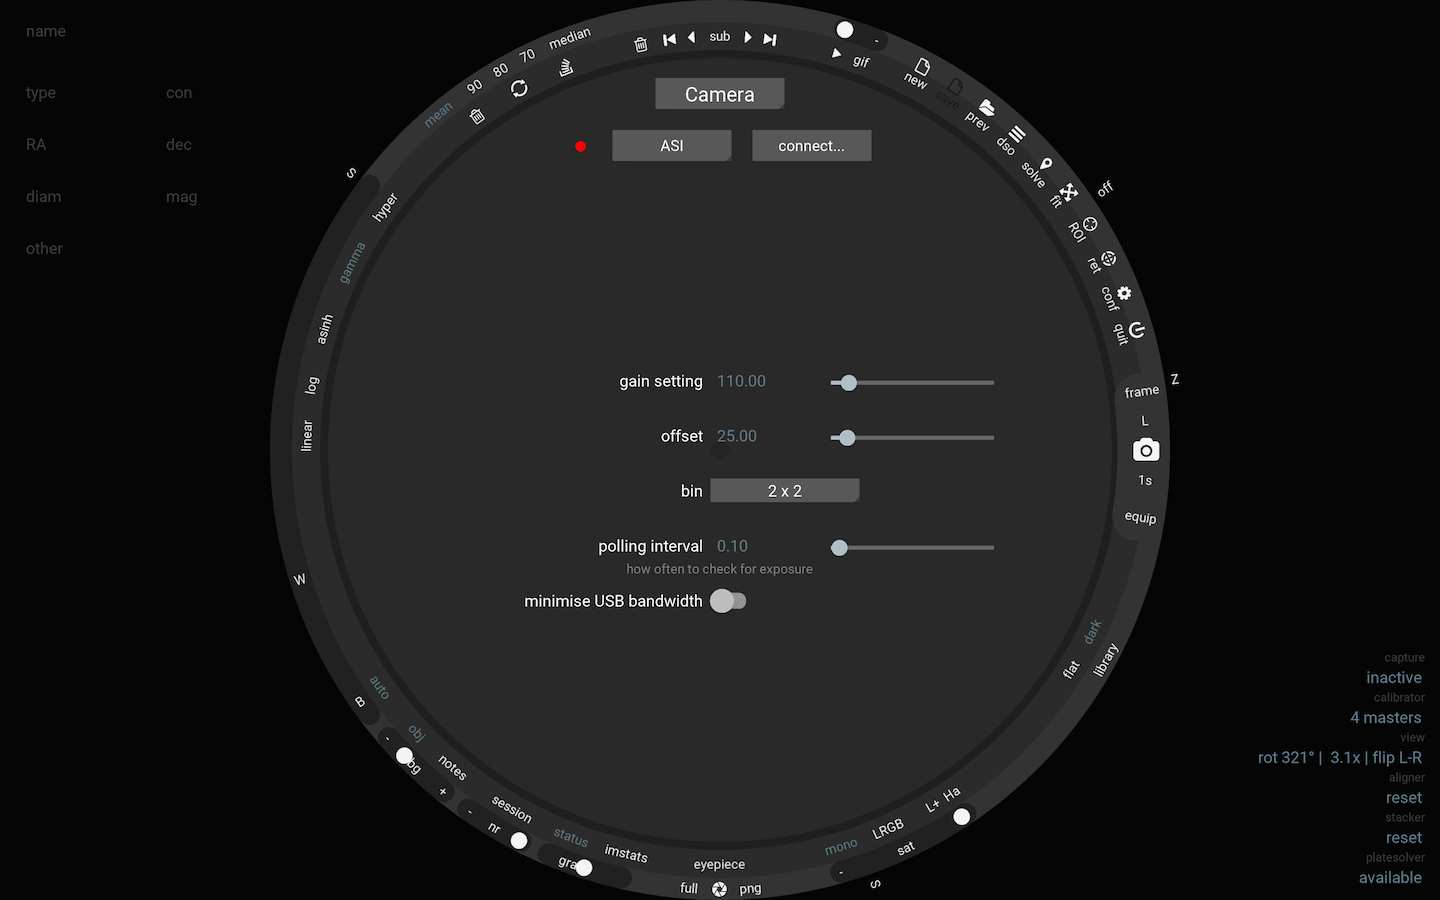
If you already have an image loaded, to start a new observation it is necessary to click 'new' (if there is anything that needs to be saved e.g. you might have altered the observers log for the image, you will be prompted to save it first). The capture controls (at around 3 o'clock) will be enabled. Before you can use them you need to connect your camera. This is done via the 'equip' button, which brings up a settings panel that will allow configuration and connection of not just cameras but filterwheels and (in the future, perhaps), also mounts and other devices.
Select the camera (or camera family) from the dropdown and click 'connect'. If successful, the indicator will turn green. You also have the opportunity now, or later, to set up various camera parameters (binning/gain/offset etc). Now leave the setup by moving the mouse away from the eyepiece and you are ready to capture your first image.
Capturing is controlled with the camera icon. This is a simple start/stop operation. You can see an exposure countdown if you have the 'status' panel open (click on 'status') in the lower right of the screen.
Capture scripts
Jocular has a number of capture scripts that are used for different purposes during the observing session. The name of the current script is displayed below the Quit icon and defaults to 'frame' at the start of a new capture. You can see (and alter) the current script by clicking on this button.
We'll look at all of these scripts in more detail in a moment, but in a typical session you'll mainly be alternating between the 'frame' and 'light' scripts. The difference between the two is that anything captured with the 'frame' script is not saved or added to the stack. Each script has an exposure setting (and a filter setting); selecting the script therefore alters the exposure/filter and means you don't need to continually alter these settings when doing the typical 'frame' then 'light' alternation.
Now try capturing some subs that are actually saved and stacked. Choose the 'light' script and start the capture. You should see the sub counter at the top incrementing as the subs are coming in. You can look at the stack just as you did when you loaded a previous object.
Changing exposure
Click on the exposure value just under the camera icon to change the exposure time. Plenty of presets are provided but you can also add your own specific exposures.
Changing filters
If you have a filterwheel or a manual filter drawer, or a filter holder that you change manually, you will need to configure it by choosing 'FilterWheel' from the 'equip' screen. (say more about this...)
For example, you might be using an H-alpha filter. Once Jocular knows about it, clicking on the name of the filter (that appears just above the camera icon) brings up a filterwheel representation containing that filter name (and any others that you have configured). Simply select the required filter prior to starting the capture.
We'll look at how to set up a sequence of filters below.
Other scripts
Besides frame and light scripts, Jocular provides further options:
- 'align' is designed for the initial star alignment phase. It brings up a reticle, renders the eyepiece transparent, and centres the incoming images. Like 'frame', images are not saved. I would normally use a very short exposure for align e.g. 20-50ms. A convenient little trick during alignment is to rotate the image about its centre until the star movement corresponds to the arrows of the hand control.
- 'focus' is a convenience script; while it would be perfectly possible to use 'align' or 'frame' for focusing, having a separate script allows you to preset an exposure that you would normally use for focusing (say 0.5-1s). It also allows for future implementation of focus aids.
- 'seq' represents a sequence of filters. Clicking on the filter representation brings up the filterwheel, and you are able to select more than one filter, and also determine how many subs will be collected in that filter before moving to the next. This script is used principally for RGB and LRGB captures, but any combination can be selected.
- 'dark' is used to collection dark frames. Like the other calibration scripts, at the end of the process Jocular will save a master calibration frame and place it in your calibration library, where it becomes instantly and automatically useable in the current and future sessions (more on calibration below). Before collecting darks, if Jocular cannot find a dark filter in your filterwheel, it will ask you to cap the scope.
- 'bias' collects darks frames at the shortest allowable exposure.
- 'flat' collects flat frames in the chosen filter and at the selected exposure. In the case of flats the individual frames are normalised to a max of 0.5 or 50% of the intensity range to enable you to use the B and W points to inspect the flat. Before saving the flats are normalised to unity.
- 'autoflat' differs from 'flat' in that it takes a series of exposures and estimates the best exposure setting for the flat before going on to collect flat subs; it also reports if it is nnot possible to collect useful flats (e.g. too bright or too dark, in the case of twilight flats).
Calibration
Jocular supports both the collection of calibration frames and their application to the current image. Jocular largely automates the latter process.
Collecting calibration frames
As described above, calibration frames are collected using one of the four calibration scripts. The collection process is much the same as collecting lights and is controlled by you clicking the camera icon to start and stop the process. All calibration subs are saved just the same as normal light subs. This means that you can reload calibration frames as if they were just another 'object' at a later point. The only difference is that you have the opportunity to save a new master each time. This can be especially useful in generating masterflats, since different processes can be applied to the frames before the master is created. It is also useful on occasions where you only remember to cap the scope after taking a few darks! Essentially, it can be used to examine, rectify and improve your masters if necessary.
By default, when producing the master frame the subs will be averaged (i.e. stack combination is via the 'mean' method). However, for flats the default is to use the '80%' option (corresponding to rejecting outliers that lie outside the central 80% of all values at each pixel). However, this can be changed during the collection of the calibration frame, so if median or mean is more appropriate then Jocular will use your selection when it comes to saving the master calibration frame.
There is one important caveat for flats: no master will be produced at the point of saving if the flats are not themselves calibrated. This ensures that any master flats that end up in Jocular's library are 'correct' in order to avoid some of the issues that arise when flats are deployed. A message appears to warn that the master flat is not generated. However, all is not lost! The flat subs can be reloaded at any point and so long as it is possible to calibrate the flats, at that point a master flat will be produced.
So what is involved in calibrating flats? Essentially, it is necessary to subtract either a master bias from each flat sub, or to subtract a so called master flat-dark (also known as dark-flat). A third option, to subtract a constant value, is also possible. The choice of which to use is available on the conf/Calibrator settings screen. If you choose 'bias', for a flat sub to be properly calibrated you should ensure that you have previously collected a master bias. Likewise, for flat-darks it is necessary to have a master dark within a certain exposure of that used for the flats. An option is available to set this tolerance. The best policy on obtaining a new camera is to create a good quality master bias (i.e. made up of a large numbr of subs); this is very quick to do and once the master is saved and in the library it will be applied silently to your flat subs.
The calibration library
Every time Jocular saves a master calibration frame, it is placed in the calibration library. The actual master FIT files can be found in the joculardata/ calibration directory. As you collect more and more calibration frames, your calibration library will grow into a useful resource.
You can examine and maintain the calibration library by clicking on the 'library' icon. This brings up a table detailing your calibration frames. Like all tabular structures in Jocular, all columns can be sorted and filtered. Clicking on the name of a calibration frame brings up the image of the master, which you can manipulate using the usual B/W/Stretch tools etc. However, you cannot alter and save it (this is done by reloading the corresponding subs as detailed above). You can also delete calibration frames using the table. As is the case for all deletions in Jocular, the frames are not deleted as such but moved to your deleted directory within joculardata. Deletion only applies to the master calibration frame and not its constituent subs. These are deleted in the usual way in the previous observations table.
Applying calibration frames to your live or previous captures
To indicate that you want to use darks, all that is required is to ensure that the 'dark' toggle is highlighted. The same applies to flats. If you know you always want to apply flats, just leave the toggle highlighted: Jocular remembers this setting from one session to the next. Note that Jocular never saves calibrated subs. Instead, since calibration is rapid it always applied 'on-the-fly'.
Applying calibration to your subs is one area where Jocular's 'redo' function comes in handy. Suppose you apply flats and then find they're not doing a good job -- maybe the camera has moved or acquired new dust since they were taken. Simply deselect flats and click the redo icon and the calibration will be undone. The same applies to darks. It can be instructive to explore the benefits of calibration frames in this way.
Asking for your incoming subs to be calibrated is one thing, but of course it requires a suitable master calibration frame to exist in your library. Jocular first identifies any suitable candidates and then looks for the best match. For example, darks need to be within a specified exposure and temperature tolerance, and for cameras with user-settable gain/offset these values must match exactly. The precise matching criteria will be documented shortly but by inspecting the settings under conf/Calibration you can see the kinds of factors at play. Jocular also calibrates subs which correspond to a sub-region of a master frame i.e. subs collected with ROI set.
Using the watched directory
You may wish to use Jocular to stack and organise your subs and observations but use a different program to collect the subs in the first place. One reason for doing things this way is that your camera is not supported by Jocular. Another is that you have a separate processor at the scope-side controlling the captures, while you are sitting inside in the warmth. The way this works is to instruct Jocular to watch a directory that you specify. Whenever a new sub arrives, Jocular will try to add it to the ongoing stack. There are quite a few options for controlling the process as well as some challenges to ensure that Jocular is able to make sense of the images that appear in this way, so let's examine some of the choices.
The watched directory is treated as a kind of camera and is therefore accessed via the 'equip' screen. Simply select 'Watched dir' as the camera type and choose a directory to watch, before clicking 'connect'. At this point, so long as Jocular is in live mode (i.e. you have pressed 'new' in the recent past and are not examining a previous observation), any FITs files that are placed in that directory will be treated as incoming subs. You can test this by simply dropping one or more files (one at a time or simultaneously) into the watched directory.
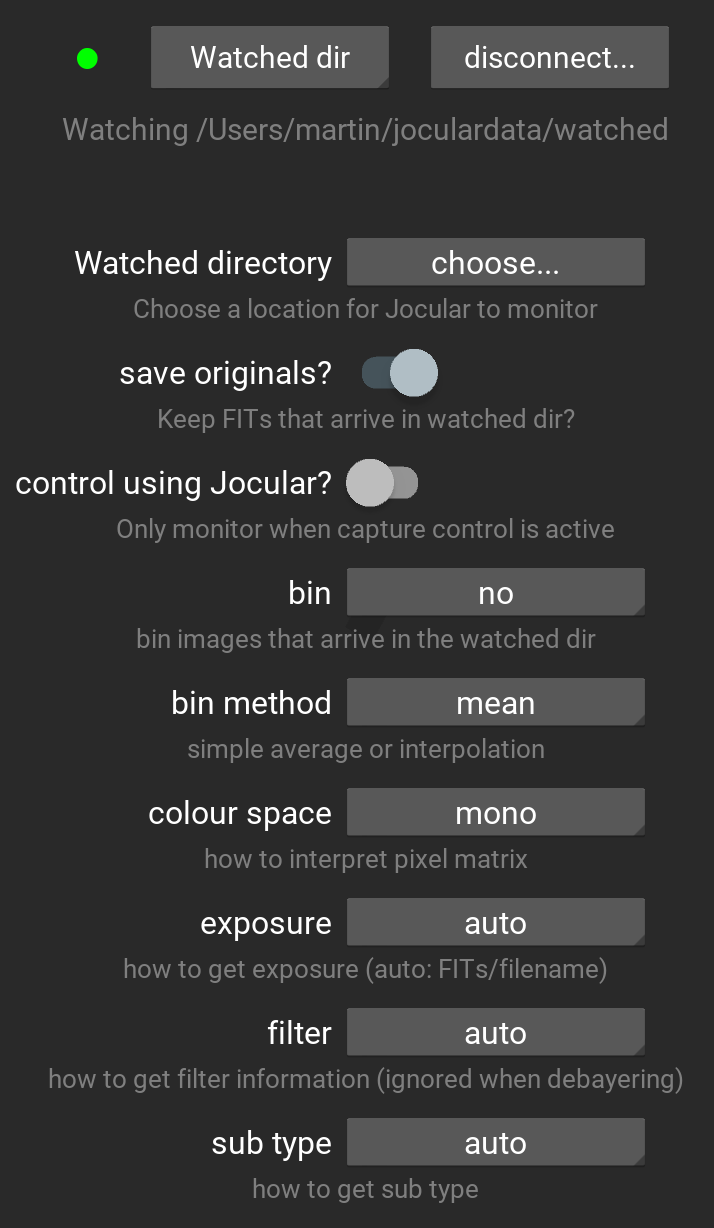
You also have the option of treating the watched folder like a real camera by controlling when the watcher is listening (with apologies for the mixed sensory metaphor). If you set the 'control using Jocular' option to on, Jocular will only handle subs that arrive when the camera icon is pressed. What happens to any that come along at other times? They are placed in the 'unused' subdirectory of the watched directory, so you can fish them out later if they're important. Whether you use this option or not depends on your observing style. For instance, you might leave the capture program running continuously, and 'slice up' the incoming subs into objects using the camera capture controls.
It is important to understand what happens to any subs that do come Jocular's way while it is listening. Jocular is capable of applying binning to those incoming subs (and perhaps in the future also ROI). It can also debayer colour frames. Additionally, Jocular always changes the FITs headers (largely to make them easier to reload within Jocular in the future). In short, Jocular is changing all subs that come its way. They become part of Jocular's ecosystem, enabling them to be organised and reloading in the future. As a consequence of this destructive tendency, Jocular provides the option to save the original subs, unscathed, and I recommend that you keep this option set to on, at least to start with.
A quick aside on Jocular's eco-system. Jocular saves your captures in the 'captures' directory of joculardata. In fact, it saves them in an individual 'object' subdirectory of a 'session' directory within the 'captures' directory. For example, if Jocular collects images of NGC 2017 on the 29th of January 2022 they would be saved in the directory captures/22_01_29/NGC 2017. The object directory would contain individual subs as well as a JSON format file with some metadata (e.g. observing notes, session characteristics such as seeing and the like). In fact, Jocular doesn't care about the session or object names you provide -- they are there for your convenience should you wish to inspect them later (perhaps for use in another program).
You can also use this mechanism in reverse by adding images captured with other tools into the Jocular system simply by inventing a session-level directory and an object-level directory and placing the fits in there (ignore the metadata -- Jocular doesn't insist upon it). It doesn't matter what you call the session level (it could be 'my captures' for example). If you want Jocular to do something intelligent with any captures added this way it is worth choosing a sensible name for the object-level directory, but this can always be added later or when the object is loaded into the tool.
The point of this diversion was to indicate where Jocular saves the original files: they are placed in a subdirectory called 'originals' within the object directory.
To be continued...